Blurred Water - Photo Tutorial
Tips & Tricks
"Blurred Motion for Waterfalls, Wave and Streams"
In the summer of 2013 I made a trip to the North West Territories for fishing and photography. Driving from Edmonton and pulling my pop up camper, I was thrilled to discover some amazing sites to photograph along the Hay River. Only about 100km north pf the Alberta/NWT border you can find twin falls Gorge Territorial park. It has a very well maintained campsite and features 2 gorgeous waterfalls; Alexandria and Louise. These waterfalls are found just off the Mackenzie highway within easy walking distance of the parking lots. You don't need to be a rugged back county hiker to take advantage of this location .
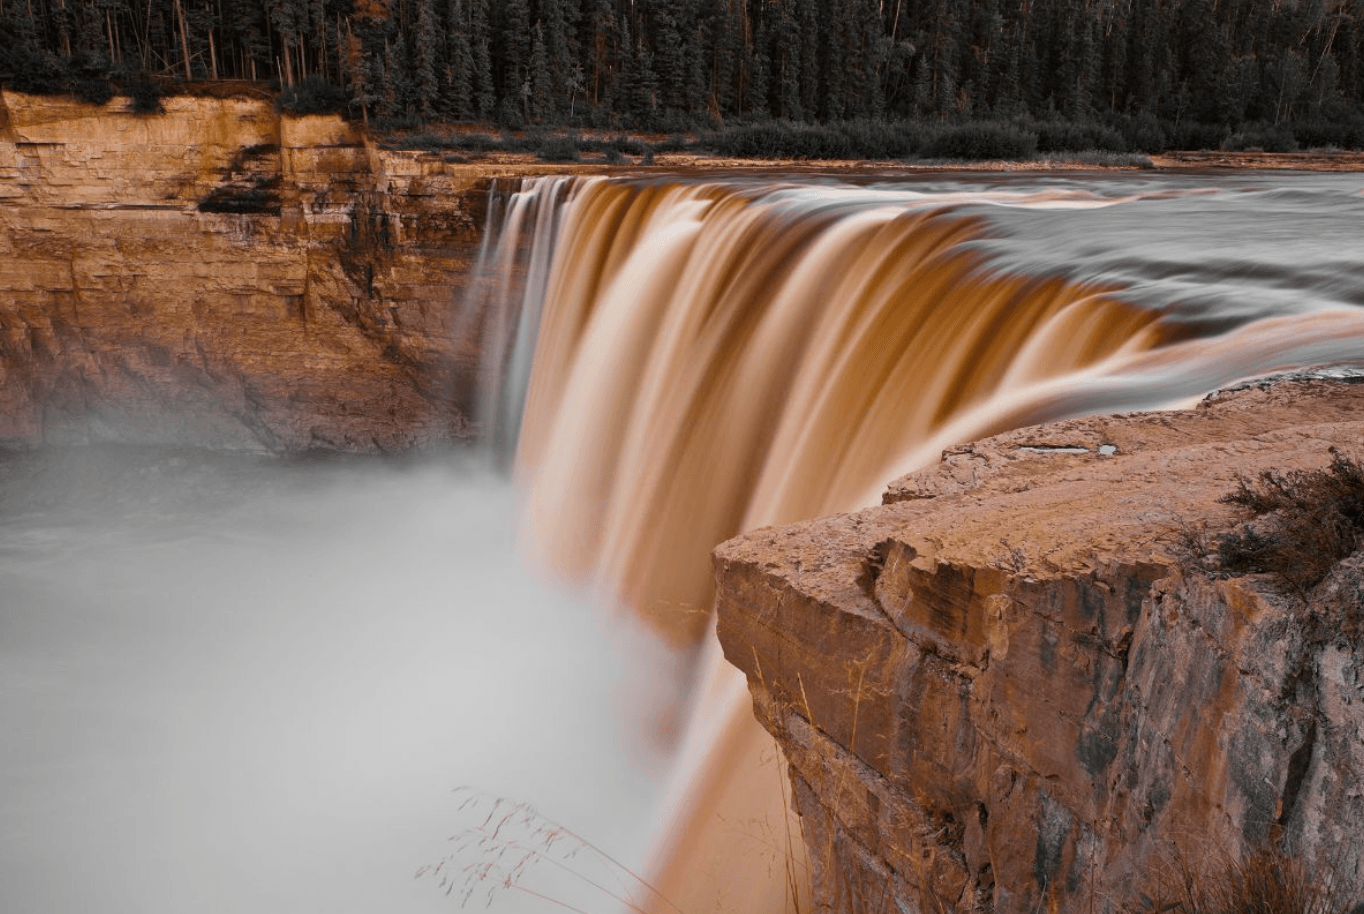
"Alexandria Falls"
Twin Gorges Territorial Park, NWT
Photographed at f22, ISO 100 and shutter speed of 3.2 seconds
I employed a common landscape photographers technique to blur the motion of the fall is in order to make the water look more beautiful and ethereal. in order to capture an image using this technique, you need a good DSLR or Mirrorless camera, a sharp wide angle lens and a sturdy tripod. A remote trigger switch is also highly advisable.
Step 01- Set up your equipment
Attach the desired lens to your camera and affix them to your tripod. attach your remote trigger to the camera. Bluetooth controlled cell phone apps can also be used to remotely trigger your camera shutter. The tripod and remote switch are vital to obtaining a clear , sharp image as you will be using a slow shutter speed . The idea is that the rocks and trees are stationary and will remain sharply in focus throughout the duration of your exposure, as long as there is not vibration or movement in your camera. the slightest vibration in the camera will cause the entire image to become blurry. When using an exposure time of greater than one second, even the act of pushing the camera shutter will cause enough vibration to noticeably reduce the sharpness of the photograph. a tripod that is of substantial weight will also help to absorb vibrations that may travel up from the ground . Many serious landscape photographers carry a small canvas bag that can be filled with rocks or sand . This rock filled bag is then attached to the tripod to add weight and reduce vibrations
Step 02- Test your exposure
Although these results can be obtained in Shutter Speed Priority Mode, Manual exposure mode is your best option. I started by adjusting my camera's ISO to it's lowest setting and Aperture to it's smallest opening. In the case of the Alexandria Falls photo, I used an ISO value of 100 and an aperture value of f22. Both of these settings create a darker image, thus creating the need for a long shutter speed in order to obtain a proper exposure . Once the ISO and aperture are set, I use my camera's built in light meter to help determine the proper exposure . To ensure that the you have the best possible exposure, I always consult my histogram to make sure I am capturing the greatest amount of detail in both shadows and highlight areas.
It is very important to note that this first test exposure MAY NOT be the ideal combination of ISO, Aperture and Shutter Speed for your particular photograph. The first exposure is simply your starting point for experimenting with different combinations ISO, Aperture and Shutter Speed. The amount of blurriness in the water can be controlled by increasing or decreasing the shutter speed. The best shutter speed will depend on the speed of the motion in the water and your personal preferences as to how " blurry" you like it.
Step 03- Set your White Balance
Now that you have a technically "good" exposure, pull out your photo grey card or white Balance disk and create a custom white balance to obtain an accurate colour rendition in your photograph. Auto White Balance will often get decent but not perfect results. A custom WB will always yield the best results.
Step 04- Compose your image
Adjust the camera tripod head to frame your photograph in the composition you desire. Zoom in or out as needed to obtain the cropping you desire. My policy is that I try to visualize my exact composition as accurately as possible, and then zoom out about 10% to 15 %. This extra 15% of space allows me to "tweak" my cropping in post production. Just in case I need to slightly straighten a horizon or make a subtle adjustment. Never shoot too wide as you will only be reducing your resolution by cropping to much.
Step 05- Focus your lens
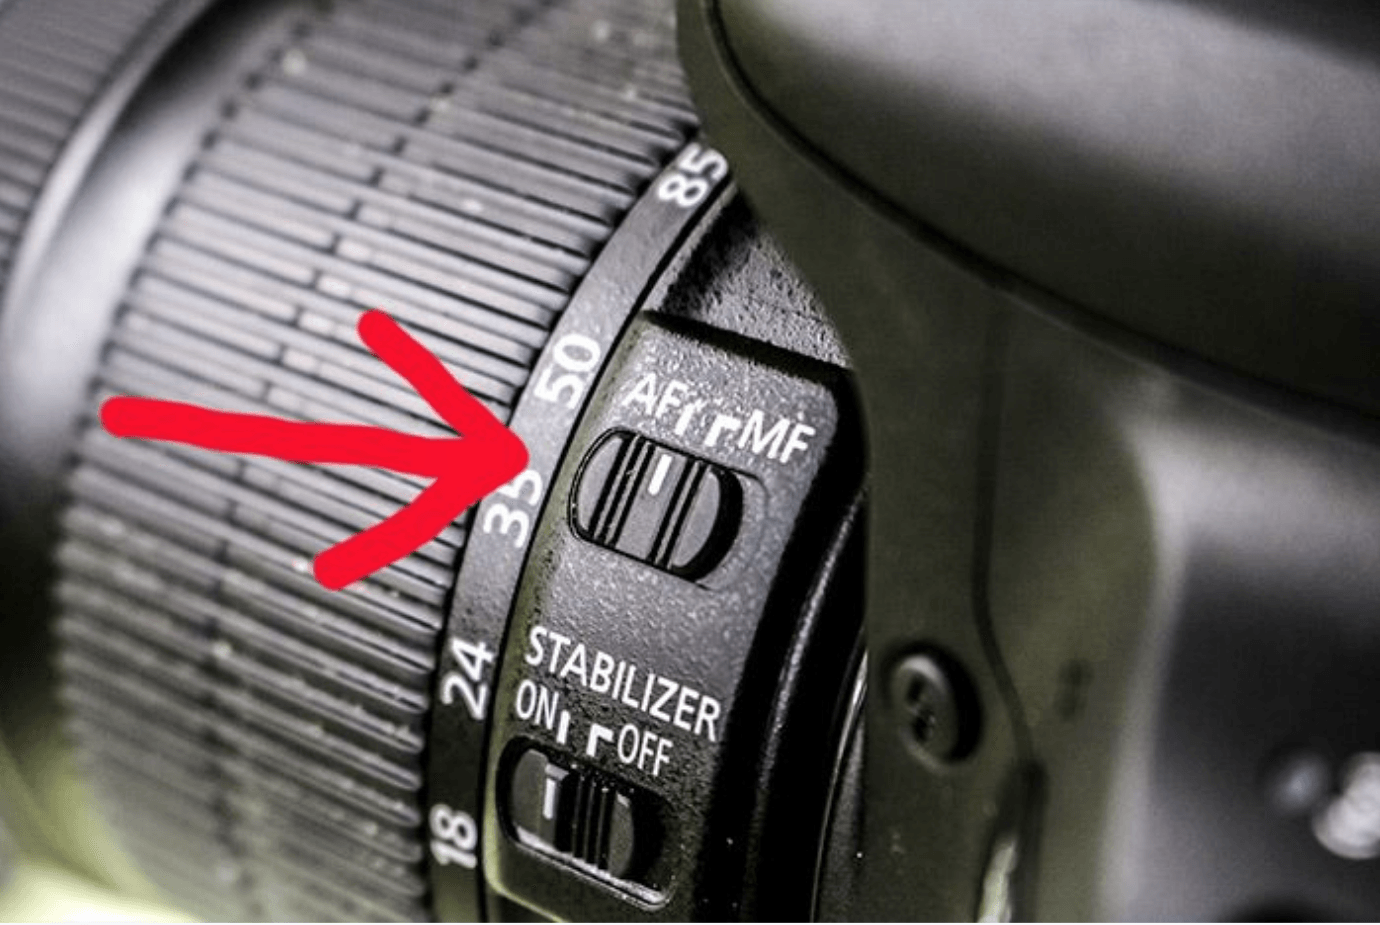
Since you are using the smallest possible aperture setting, you will be capturing the greatest possible depth of field in your photograph. In order to utilize this depth of field to create the sharpest possible image from foreground to background, I focus on a point beyond the foreground. In the case of the Alexandria Falls example , I focused the camera on the farthest edge of the rocky platform in the foreground . In other words, at the point where the rocks and the water meet. Once focus lock is obtained, switch your camera lens from AF (auto focus) to MF 9 Manual Focus) . This will prevent your camera from changing the focus of the lens every time you take a photo. Since you are using a tripod and the camera is not moving, there is no need to refocus the lens. Your camera will remain focused at the distance you have just set and the depth of fields will ensure that all the items in the view finder are sharp as a tack.
When setting your focus, it is important that you do not move the position of your tripod. Only adjust the tripod head to pan or rotate your camera into position. Once you have obtained focus, adjust the tripod head to the proper composition and tighten the tripod head so it will not move for next 15 minutes. It is vital that you do not move the your tripod or touch/ adjust the zoom or focus ring on your lens in any way after this point. any adjustments or movement will result in an our of focus image. If an accident happens, then go back to step 04 and repeat as necessary.
Step 06- Experiment with different shutter speeds
As mentioned above, you will need to experiment with different shutter speeds in order to find the setting that is best for your particular scene. The proper speed will depend on how fast the water is actually moving and on your particular taste. Just how blurry do you like that water? You can cause the water to look less blurry by using a faster shutter speed or more blurry by using a slower shutter speed. Start by examining the test exposure you have already taken. Decide if you think it would look better with more motion blur or less motion blur in the water. Then adjust the shutter speed in 1/3 stop increments until the desired results are achieved. It is important to note that when you adjust the shutter speed , you will affect your exposure. You must adjust either the aperture or ISO in an opposite direction to maintain a proper exposure.
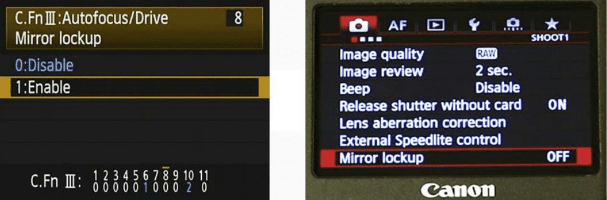
Step 07- Lock up the mirror
The tripod and remote trigger switch might be adequate to hold the camera still for the serious photographer if you are using a DSLR camera. Even the act of the mirror inside your camera moving from the upper position to allow light to pass through the shutter and strike the sensor can cause vibration and decrease the sharpness of your image. Consult your manual to find the menu setting to lock up your mirror prior to creating your final exposure. Skip this step if you are using a mirror-less camera.
Step 08- Create your masterpiece
You are ready to go. Lock up the mirror, wait a few seconds for any vibrations to subside and push the button on your remote switch. You should have an image worthy of framing.
Have Fun!
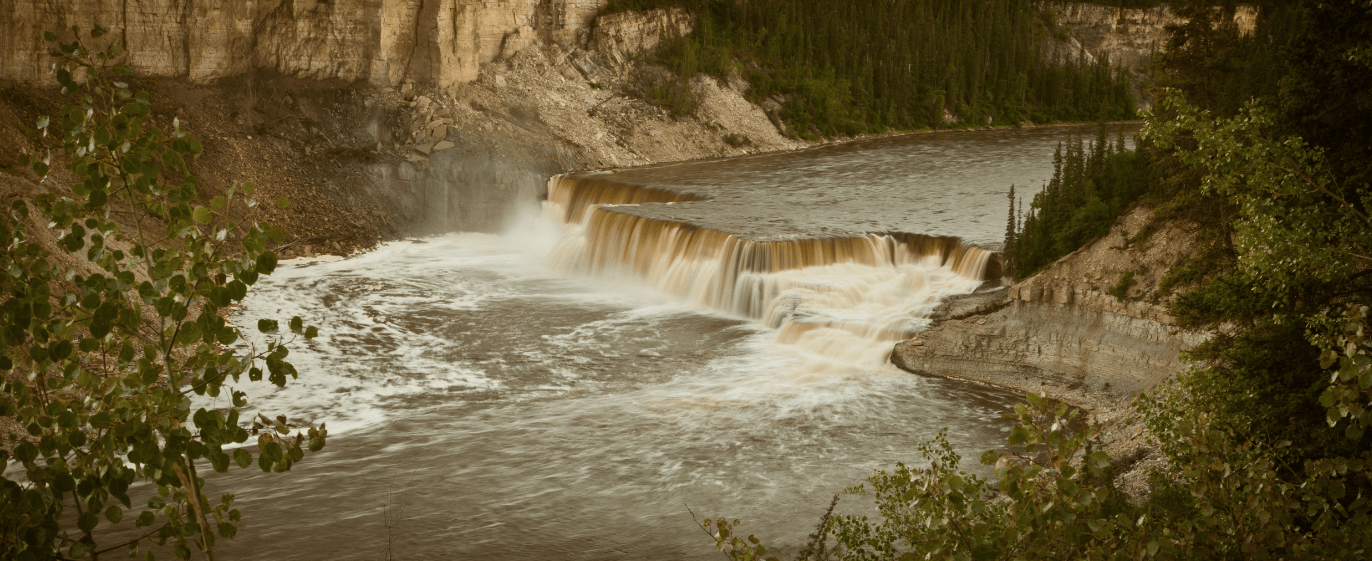
"Louise Falls"
Twin Gorges Territorial Park, NWT
Photographed at f22, ISO 50 and shutter speed of 1.3 seconds
If you are trying this out in bright daylight, you might find that even at your lowest ISO and smallest aperture, you are not able to obtain a shutter speed slow enough to blur the water the desired amount. There may be too much light to allow for such a slow shutter speed without over exposing your image. The best option would be to try creating the photo at either sunrise or sunset, when the light is soft, beautiful and of lower intensity. If this is not practical, you may attach a polarizing filter to your lens . A polarize will act like sunglasses for your camera and reduce your exposure by 2 to 2.5 stops.
The image of Louise falls shown above was taken earlier in the day. The falls lay lower in the gorge and the light is soft and even, many hours before sunset. Alexandria falls is located at a higher elevation at the top of the gorge . The photograph of Alexandria falls was taken at sunset in order to obtain the most beautiful light. fortunately sunset lasts for many hours in the NWT so photographers never need to rush before they lose the light.
Chris Stambaugh, MPA
Instructor and Administrator
Burwell School of Photography